
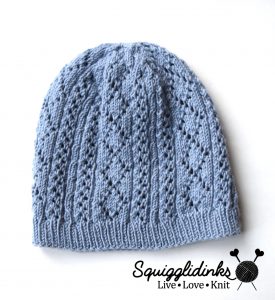
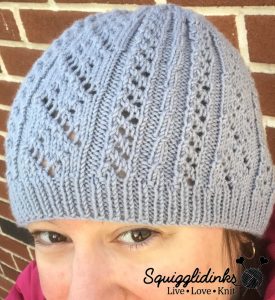
This hat was a long time coming. I’ve had the Eva Scarf for over ten years, my favorite scarf for spring and fall. I’ve been wanting a matching hat for ages, but the math to get the lace pattern to work out across the right number of stitches was too intimidating.
But it was worth the wait. I loved knitting it, and it’s the softest, lightest hat I’ve ever worn. I used Debbie Bliss Baby Cashmerino in Mist, and I have to say I think it’s my favorite yarn I’ve used so far. It is sooo soft and easy to work with. It’s a blend of 55% extrafine merino wool and 12% cashmere with 33% acrylic. I used about 1.5 skeins for this hat, since the skeins are really small.
Gauge is really important with this project. I knit my gauge swatch for this project in stockinette stitch for simplicity with measuring, and I recommend you do the same. Because of how the lace pattern repeats, I couldn’t grade this pattern for different sizes like I normally would. I wrote it for a hat with a 22” circumference, which is an average adult size. If you want to knit a larger hat, with a 24” circumference, you’ll need to use larger needles/yarn to give you a gauge of 5.5 stitches per inch. If you want to make a smaller hat—a child/teen size with a 20” circumference—you’ll need to use smaller needles/yarn to give you a gauge of 6.75 stitches per inch. Follow the rest of the pattern as directed, just using the altered gauge.
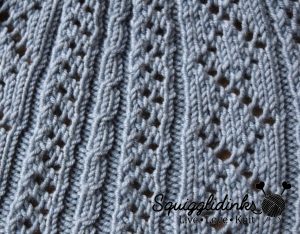
I’ve written the pattern as both a chart and as written instructions, so you can follow whichever you find easier. In my opinion, the chart is easier, because it gives you a more visual idea of what the lace pattern looks like as you go. If you’re new to following charts, Tin Can Knits has an awesome tutorial here. I would just add that you should make sure you’re familiar with the symbols in the key before you start. I used one special stitch marker to mark the beginning of the round and then I placed an ordinary stitch marker at the beginning of every repeat of the pattern (every 27 stitches) so that I wouldn’t get lost. Another note: the gray squares at the top of the chart are grayed out because those are stitches that have already been decreased away for the top of the hat. You don’t knit anything there—those squares no longer exist in your knitting. Only the white ones matter.
Another trick that makes this pattern easier is cabling without a cable needle. I never bother with a cable needle—usually I just use a pen cap that I keep in my notions bag. But try this trick too: when you come to the 1/1 rc, take your right needle in front and slip it purl-wise into the second stitch on the left needle. (Make sure you go in front of the first stitch to do this.) Slip both stitches off the left needle, taking the first stitch (the one not on the right needle) in your free hand. (It should be in back.) Put that first stitch back on the left needle, then slip the second stitch back onto the left needle from your right needle. The two stitches have changed position. Now you can knit them. Tada! No cable needle.
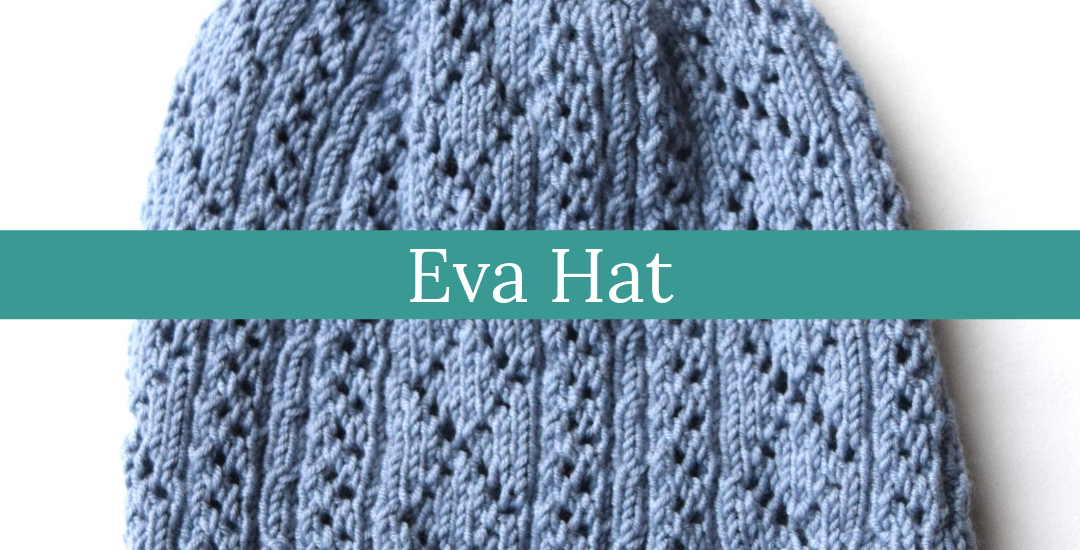
Without further ado, here’s the Eva Hat, and I hope you love knitting it as much as I did!
Eva Hat
Pattern notes: This pattern is written for an average adult size hat (22” circumference). To make a child/teen size (20”), use needles/yarn that will give you a gauge of 6.75 stitches per inch. To make a large adult size (24”), use needles/yarn that will give you a gauge of 5.5 stitches per inch.
Needles: US size 4 (3.5 mm), 16” and double pointed (optional)
Yarns used: Debbie Bliss Baby Cashmerino (55% Extrafine Merino Wool/33% Acrylic/12% Cashmere; 136.7 yards/50 grams), 1.5 skeins of Mist
Yardage: about 200 yards
Gauge: 25 stitches and 36 rows in 4 inches.
Other Notions: 5 stitch markers (1 different from the other 4 to mark the beginning of the round), cable needle (optional).
Final Measurements: 22”
Stitch Abbreviations:
k=knit
p=purl
yo=yarn over
k2tog=knit two together
ssk=slip slip knit
1/1 rc=Slip one stitch onto cable needle, hold behind work. Knit next stitch. Knit stitch from cable needle.
Chart:
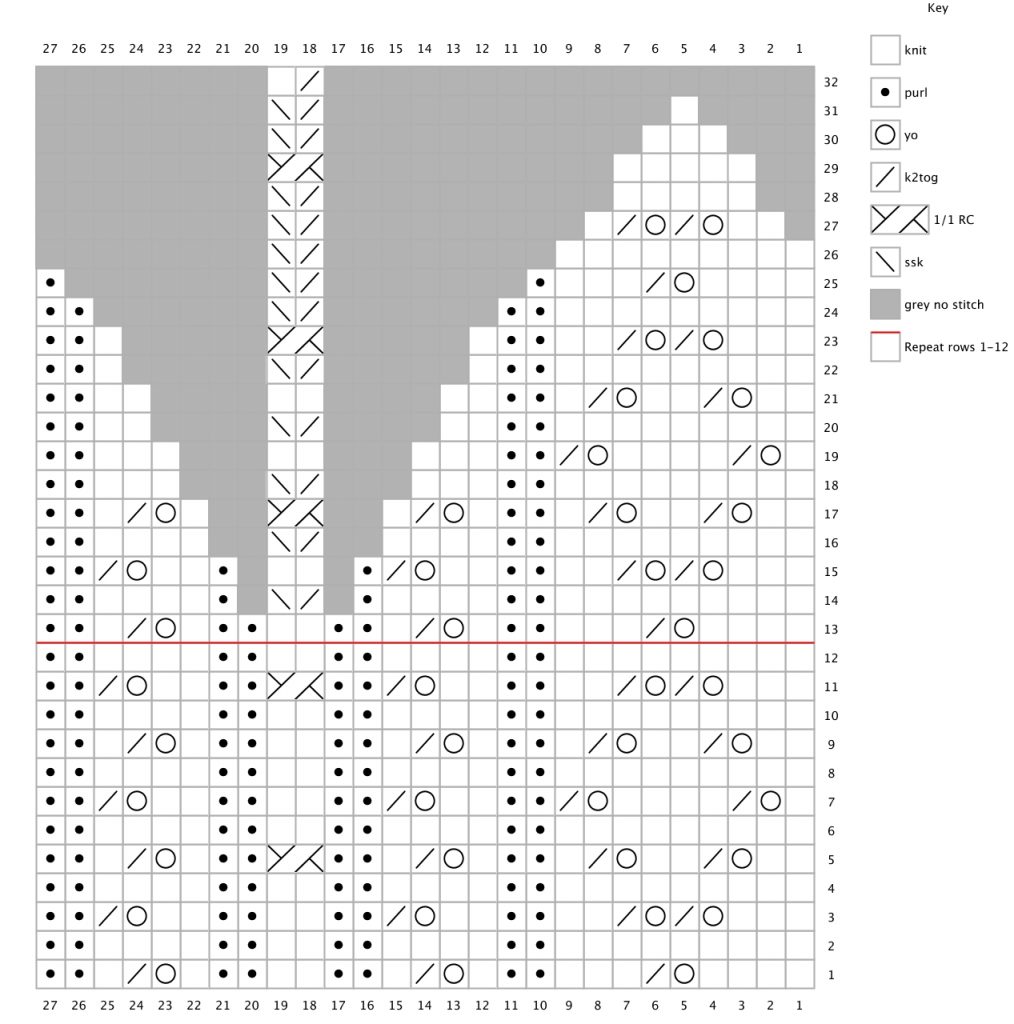
Pattern:
Brim:
Cast on 136 stitches. Join, being careful not to twist stitches. Place marker to mark the start of the round.
Rounds 1-8: k1, p1, repeat to end.
Round 9: k1, p1, repeat to last 2 stitches, ssk.
From here you can either follow the chart above or the written instructions. Place markers at every pattern repeat (every 27 sts) if desired. Repeat rounds 1-12 a total of 4 times before moving on to the decreases.
Lace pattern:
Round 1: *k4, yo, k2tog, k3, p2, k1, yo, k2tog, k1, p2, k2, p2, k1, yo, k2tog, k1, p2, repeat from * to end.
All even rounds 2-12: *k9, p2, k4, p2, k2, p2, k4, p2, repeat from * to end.
Round 3: *k3, yo, k2tog, yo, k2tog, k2, p2, k2, yo, k2tog, p2, k2, p2, k2, yo, k2tog, p2, repeat from * to end.
Round 5: *k2, yo, k2tog, k2, yo, k2tog, k1, p2, k1, yo, k2tog, k1, p2, 1/1 rc, p2, k1, yo, k2tog, k1, p2, repeat from * to end.
Round 7: *k1, yo, k2tog, k4, yo, k2tog, p2, k2, yo, k2tog, p2, k2, p2, k2, yo, k2tog, p2, repeat from * to end.
Round 9: *k2, yo, k2tog, k2, yo, k2tog, k1, p2, k1, yo, k2tog, k1, p2, k2, p2, k1, yo, k2tog, k1, p2, repeat from * to end.
Round 11: *k3, yo, k2tog, yo, k2tog, k2, p2, k2, yo, k2tog, p2, 1/1 rc, p2, k2, yo, k2tog, p2, repeat from * to end.
Repeat rounds 1-12 a total of 4 times.
Decreases:
Switch to dpn whenever the stitches become too tight on your needles.
Round 13: *k4, yo, k2tog, k3, p2, k1, yo, k2tog, k1, p2, k2, p2, k1, yo, k2tog, k1, p2, repeat from * to end.
Round 14: *k9, p2, k4, p1, k2tog, ssk, p1, k4, p2, repeat from * to end.
Round 15: *k3, yo, k2tog, yo, k2tog, k2, p2, k2, yo, k2tog, p1, k2, p1, k2, yo, k2tog, p2, repeat from * to end.
Round 16: *k9, p2, k4, k2tog, ssk, k4, p2, repeat from * to end.
Round 17: *k2, yo, k2tog, k2, yo, k2tog, k1, p2, k1, yo, k2tog, k1, 1/1 rc, k1, yo, k2tog, k1, p2, repeat from * to end.
Round 18: *k9, p2, k3, k2tog, ssk, k3, p2, repeat from * to end.
Round 19: *k1, yo, k2tog, k4, yo, k2tog, p2, k8, p2, repeat from * to end.
Round 20: *k9, p2, k2, k2tog, ssk, k2, p2, repeat from * to end.
Round 21: *k2, yo, k2tog, k2, yo, k2tog, k1, p2, k6, p2, repeat from * to end.
Round 22: *k9, p2, k1, k2tog, ssk, k1, p2, repeat from * to end.
Round 23: *k3, yo, k2tog, yo, k2tog, k2, p2, k1, 1/1 rc, k1, p1, repeat from * to end.
Round 24: *k9, p2, k2tog, ssk, p2, repeat from * to end.
Round 25: *k4, yo, k2tog, k3, p1, k2tog, ssk, p1, repeat from * to end.
Round 26: *k9, k2tog, ssk, repeat from * to end.
Round 27: *k2, yo, k2tog, yo, k2tog, k1, k2tog, ssk, repeat from * to end.
Round 28: *k5, k2tog, ssk, repeat from * to end.
Round 29: *k5, 1/1 rc, repeat from * to end.
Round 30: *k3, k2tog, ssk, repeat from * to end.
Round 31: *k1, k2tog, ssk, repeat from * to end.
Round 32: *k2tog, k1, repeat from * to end.
Cut a 6 inch tail. Thread through remaining stitches on needles and pull snug. Sew all ends under.
[…] that was a rhetorical question), but I always come back to worsted weight. Even after making my Eva Hat in Debbie Bliss Baby Cashmerino, my favorite yarn to work with so far, I couldn’t help […]
I love this hat, but is this the way it is finished?
Hi Helen, I’m so sorry, you’re right, I left out the last steps of sewing the ends under and such. I’ve just added it all in. Thanks for pointing it out to me!
Eliza
I loved knitting this hat but I have a question. I am new to knitting and even newer to circular knitting. Google as I go! Anyway at the 24th row, after the band, the beanie starts looking the right way round. I didn’t realise that for the first 24 rows I was knitting inside out. How did I manage that. I was always going clockwise but for the first rows I had the needles at 12 o’clock position instead of 6 o’clock. (ie closest to me) could that be the reason or could I have missed a row? would that have put the pattern on the wrong side.? Hope you can shed some light on this as it’s a lot of work to redo and I’m not quick at seeing mistakes. Thanks
Chrissie (NZ)
Hi Chrissie,
I’m so sorry, I can’t give you any good answers without actually seeing it. Best of luck, and email me if you have other questions!
Eliza